
Residential Water Softener Guide: Choose What Fits Your Home, Not What Sells the Most
Walk into any water treatment shop and you'll be shown the same two or three "best-selling" models, regardless of whether your water has iron, whether you live in a 1BHK flat, or whether you run a 4-bathroom independent house. High sales volume doesn't mean a product suits your home — it usually just means it suits the shop's margins and stock.
Before you buy anything, understand what a softener actually does, what stages your specific water needs, how much room it will occupy, and which automation level genuinely matches your lifestyle. That's the only checklist that matters.
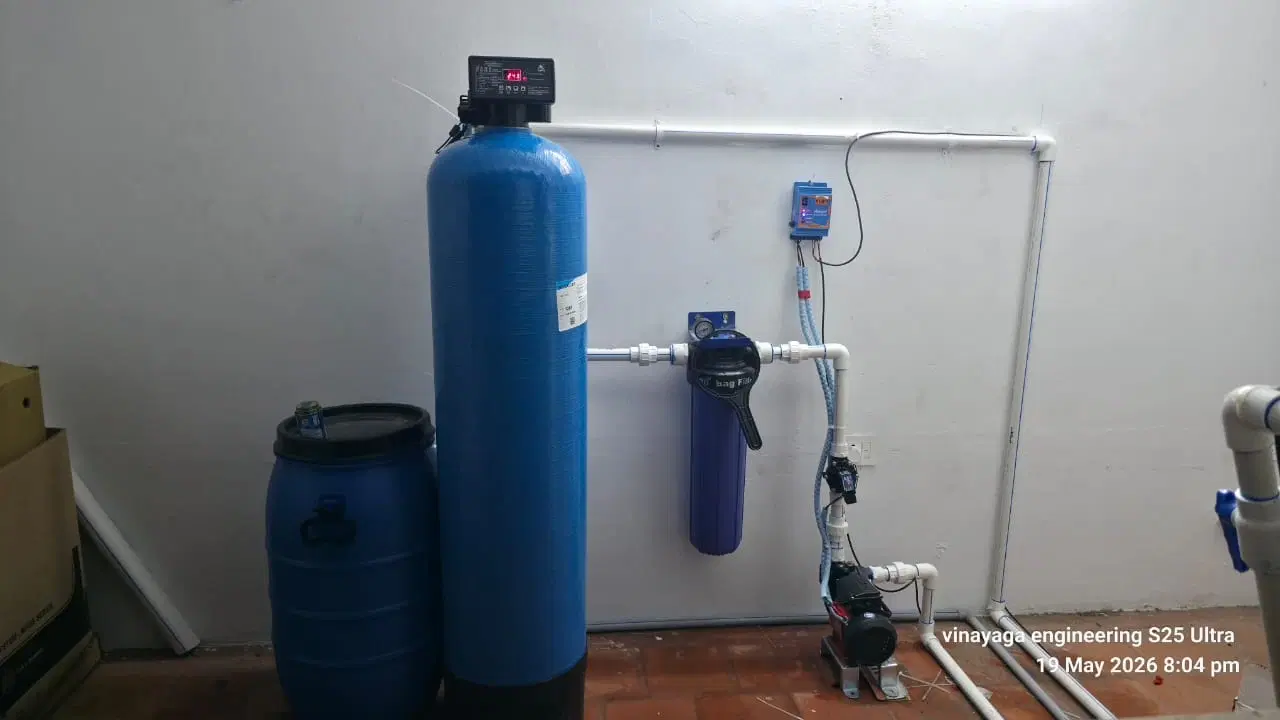
How a Water Softener Actually Works
At its core, a softener runs your water through a tank of resin beads coated with sodium ions. As hard water passes through, calcium and magnesium ions swap places with the sodium — the resin holds onto the hardness minerals, and softened water flows out the other end.
Over time the resin bed fills up with trapped minerals and needs "regeneration" — a rinse with concentrated salt (brine) that flushes the calcium and magnesium out to drain and recharges the resin with fresh sodium. This is the single mechanical cycle every ion-exchange softener repeats, whether it costs ₹15,000 or ₹1,50,000.
What it will not do: soften water by removing all dissolved solids, purify water for drinking, or fix a smell caused by bacteria or sulfur. Those need separate treatment.
Stages Your Home Actually Needs (Not What's on the Shelf)
Don't buy a bundled multi-stage unit just because it's marketed as "complete." Match the stage to what your water test actually shows.
Stage 1 — Sediment / Pre-Filter (Almost Always Needed)
Traps sand, silt, and rust particles before they reach the resin. Skipping this is the #1 reason softener resin dies early in borewell-fed homes. If your water runs cloudy or leaves grit in a bucket overnight, this stage is non-negotiable.
Stage 2 — Iron Removal (Only If Your Water Has Iron)
Standard softening resin is not built to handle dissolved iron — it fouls the beads and turns them reddish-brown, killing their exchange capacity within months. If your water leaves orange-brown stains on white clothes, tiles, or bathroom fittings, you need a dedicated iron removal stage (an oxidizing filter or iron-specific resin) before the softening resin, not instead of it.
Signs you need this stage:
- Reddish-brown staining on sinks, toilets, or laundry
- A metallic taste or smell
- Water that turns cloudy-orange after standing a few minutes
Signs you can skip it:
- Clear water, no staining, hardness is the only issue on your test report
How the Aeration Tank Converts Iron So It Can Be Filtered
Raw borewell water usually carries iron in its ferrous form (Fe²⁺) — dissolved, invisible, and passes straight through a normal filter because it's still in solution. Filtration media can't trap something that's dissolved.
An aeration tank solves this by exposing the incoming water to air (either by spraying it through a nozzle into an open-top tank, or bubbling air through it with a small compressor). The oxygen in that air reacts with the dissolved ferrous iron and oxidizes it into ferric iron (Fe³⁺) — which is no longer soluble. Ferric iron forms tiny solid rust-like particles suspended in the water.
Once iron is in this solid, oxidized (ferric) form, it can finally be caught by a filter bed — typically a manganese dioxide or catalytic media bed placed right after the aeration tank. This is why aeration always sits before the iron filter media, and both sit before the softening resin: the softening resin isn't designed to trap oxidized particles and would clog quickly if iron reached it unconverted.
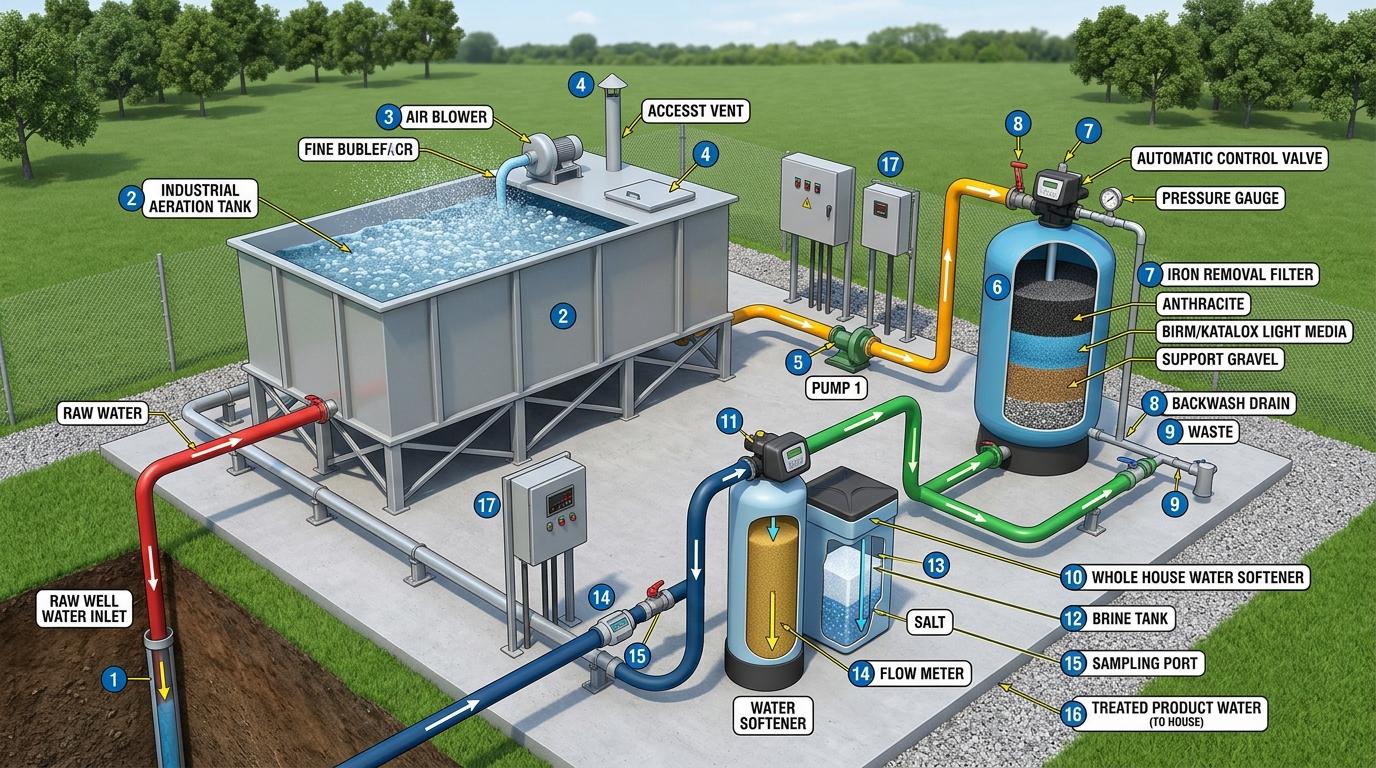
What this stage actually removes:
- Colour — the yellow/orange tint caused by suspended ferric particles
- Smell — the metallic or "rotten egg"-adjacent odor often carried alongside dissolved iron and trace gases, which aeration also helps vent off
- Particles — the oxidized rust-like iron solids themselves, captured by the filter media bed after conversion
Backwash — how the iron filter cleans itself:
Over time the filter media bed accumulates the trapped ferric particles and starts losing its capacity to catch more. Backwashing reverses the water flow direction through the media bed at higher pressure, lifting and flushing the accumulated iron sediment out through a drain line, loosening and re-settling the media bed in the process. This typically runs automatically on a timer (commonly every 1–3 days depending on iron load) on automatic units, or is triggered manually on basic setups. Without regular backwash, the bed compacts, flow rate drops, and iron starts breaking through untreated.
Space needed for the iron removal setup:
- Aeration tank: Usually a separate open or semi-open tank, roughly 2 x 2 feet footprint and 4–5 feet in height, positioned before the iron filter and softener in the treatment line.
- Iron filter vessel: Similar footprint to a softener resin tank — about 1.5–2 feet diameter, 4–5 feet height.
- Combined line space: Since aeration tank + iron filter + softener resin tank + brine tank all sit in sequence, budget an additional 3–4 feet of floor length beyond a standard softener-only setup — this is the main reason iron treatment doesn't suit tight indoor cupboards and is usually placed in an outdoor utility yard or plant room with open ventilation (the aeration step needs airflow to work).
Suitability for entire-home treatment:
An aeration-plus-iron-filter stage ahead of a whole-house softener is well suited to entire-home treatment specifically because iron fouls softening resin permanently if left untreated — protecting the softener this way protects every downstream tap, geyser, and appliance in the house, not just one bathroom. For a single point-of-use setup (one tap or one washing machine line), a full aeration tank is usually overkill; a compact inline oxidizing cartridge is a lighter-weight alternative, though it needs more frequent cartridge changes than a full aeration-and-backwash system.
Stage 3 — Calcium & Magnesium Softening (The Core Stage)
This is the actual ion-exchange resin bed described above. Every softener needs this stage — it's the reason you're buying one in the first place. The only variable is sizing the resin volume to your hardness level and household usage (covered below).
Stage 4 — Post-Filter (Optional, Situational)
A fine sediment or carbon polish filter after the softener catches any resin fines that escape during regeneration. Useful if the softened water feeds directly into a washing machine or geyser with tight tolerances; skippable for basic bathroom-only setups.
The point: a home with iron-free, moderately hard borewell water needs Stage 1 + Stage 3 only. A home with iron-heavy deep borewell water needs all four. Buying the "iron + calcium + magnesium" combo unit when you don't have iron just adds cost and another cartridge to replace for no benefit.
Automatic vs Semi-Automatic vs Manual — What's Actually Different
| Type | How Regeneration Happens | Daily Effort | Typical Cost Position |
|---|---|---|---|
| Manual | You physically operate valves/levers and add salt on a schedule you track yourself | High — easy to forget, leads to hard water sneaking through | Lowest upfront |
| Semi-Automatic | A timer or manual trigger starts the regeneration cycle, but you still add salt and sometimes switch valves by hand | Moderate — periodic attention needed | Mid-range |
| Fully Automatic (MPV-based) | A digital Multi-Port Valve regenerates on its own based on time or actual water volume used, usually at night | Minimal — refill the salt tank every few weeks | Highest upfront, lowest effort |
Which One Is Actually Best?
For most residential households, fully automatic (volume or time-based MPV) is worth the extra cost. Here's the honest reasoning:
- Manual systems fail silently. The moment you forget a regeneration cycle, your "soft" water quietly turns hard again, and you won't notice until scaling shows up on your geyser or your soap stops lathering.
- Semi-automatic is a reasonable middle ground only if someone in the house is genuinely disciplined about tracking cycles — realistically rare beyond the first few months.
- Automatic units pay for themselves in resin life. Because regeneration happens exactly when needed (not too early, not too late), the resin bed lasts closer to its full 5–8 year rated life instead of degrading from over-use or under-maintenance.
The exception: if you have a small point-of-use unit (just one bathroom tap or washing machine line) with very light usage, a semi-automatic or even manual cartridge-style unit is perfectly adequate — the stakes and the water volume are both low.
How Much Space Do You Actually Need?
Space requirement scales with tank size, which scales with resin volume and salt storage — not with brand or "features."
1BHK / Single Bathroom Setup
- Footprint: Roughly 2 x 1.5 feet (a corner of the utility area or balcony works)
- Height clearance: About 4 to 4.5 feet including the brine tank alongside
- Typical unit: Point-of-use or a small-capacity automatic softener, sized to 1,000–1,500 LPH
- Placement tip: Needs to sit close to the incoming main line or overhead tank feed, with a floor drain nearby for backwash discharge
2–3 BHK / Standard Independent House (2–3 bathrooms)
- Footprint: About 3 x 2 feet for the mineral tank plus brine tank side by side
- Height clearance: 5 to 5.5 feet is safest, since some resin tanks run tall
- Typical unit: Whole-house automatic softener sized to 2,000–3,000 LPH
- Placement tip: Best installed in an open utility yard or a dedicated plant room before the overhead tank inlet — not inside a closed cupboard, since the unit needs ventilation and occasional access for salt refills
Large Villa / Whole-Home High-Flow Setup
- Footprint: 4 x 3 feet or more, sometimes with twin tanks (alternating) so one regenerates while the other supplies water
- Height clearance: 6 feet or more for larger vessels
- Typical unit: 3,500+ LPH automatic system, often with a separate iron removal vessel taking additional space alongside
- Placement tip: A dedicated outdoor plant room with drainage and electrical points for the digital valve is the standard setup — trying to squeeze this into a passage will cause access problems during future maintenance
General rule of thumb: budget roughly 1 square foot of floor space per 500–700 LPH of rated flow capacity, plus room to open the salt tank lid fully for refilling.
🛠️ Interactive Maintenance Checklist
Keep track of your water softener health checks. Click on items below to cross them off:
The Real Decision Filter
Skip the "bestseller" sticker and ask instead:
- What does my actual water test show — hardness only, or hardness plus iron?
- How many bathrooms and how much daily water volume am I really running through this?
- Do I have the floor space and drainage for a whole-house unit, or does a point-of-use setup make more sense?
- Am I disciplined enough to manage manual regeneration, or is automatic worth the extra cost for my peace of mind?
A unit sized and staged for your actual water and actual home will always outperform a generic high-volume seller that was built for an average household that isn't yours.